In your Aquamax 4 star gas water heater, there’s a small pilot flame that should remain alight at all times. This small flame lights the main burner whenever water in the tank needs heating. If you can’t get hot water it may be because the Aquamax pilot light has gone out and thus, there’s no way for the main burner to be relit. This could occur for a number of reasons such strong winds, gas maintenance work carried out in the street or an empty LPG cylinder. Today, we’ll show you the safe correct way to relight your gas water heater. As you’ll see, it’s quite easy. However, it is vital that you follow this procedure exactly to prevent a buildup of gas, which if ignites, can cause serious injury.
Before beginning, ensure all flames and ignition sources including cigarettes and lighters are kept well away from the area.
Check For Gas Leaks
First, remove the access panel. The instructions for relighting your Aquamax pilot light are clearly laid out inside this panel. It is important to ensure there are no gas leaks. This is best done by simply smelling for gas, especially down the floor level where gas can accumulate. If you smell gas, turn the gas control knob to the off position. Shut off the isolation valve in the gas line. Leave the area and call for a qualified service technician.
Turn Off Control And Wait Five Minutes
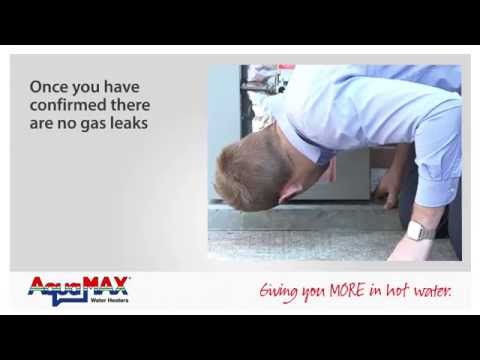
Once you’ve confirmed there are no gas leaks, turn the gas control knob fully clockwise to the off position. You should feel the control knob clicking to the off position. Do not use tools to turn the knob. If you cannot turn the knob by hand call a service technician or licensed gasfitter. It is vital at this point that you wait five minutes for any unburned gas to escape. If you do not wait the full five minutes, residual gas may ignite and cause serious injury.
Light The Pilot
Once five minutes has elapsed, we’re ready to light the pilot using the igniter button. You must remember that this button produces a spark that will ignite any gas that is nearby. This is why it is so important that you turn the control knob to “off” and wait five minutes for the gas to dissipate before every time you use the igniter button. Next, turn the control knob to the pilot position. This is the symbol that looks like a starburst. Depress the control knob fully and keep holding the knob down to allow sufficient gas to flow to the pilot light. After waiting for 30 seconds with the control knob held down, keep the control knob down and now press the igniter button repeatedly for about 40 seconds. Keep your face clear of the combustion chamber. At this point, the pilot should be alight. It is important that you continue to hold the control knob down for a further 20 seconds for the pilot light to establish itself. You can now release the knob. Once the control knob is released, check that the pilot is alight. Do this by looking into the combustion chamber just below the gas control. The pilot will be visible as a very small blue flame.
If The Pilot Is Not Alight
If the pilot is not alight, it is vital that you turn the gas control knob to off then once again, wait for five minutes for the gas to disperse. Once five minutes is up, begin the pilot lighting process again from the start. Back where we turn the control knob from the “off” position to the pilot position.
Once The Pilot Is Alight
Once the pilot is alight, it’s important for your safety that you remove your face from directly in front of the combustion chamber opening. Then turn the control knob anti-clockwise to at least five. This will allow the main burner to light whenever the water needs heating. When the main burner lights up, it can be a little noisy for the first 2 to 5 seconds, this is perfectly normal. It will very soon settle down to a quiet flame. You can now replace the access panel.
Let’s Review
As you can see, it’s a straightforward procedure but does need to be followed exactly./p>
1. Turn the control knob to off.
2. Wait five minutes for gas to disperse.
3. Now turn the control knob to pilot.
4. Press the control knob down for 30 seconds.
5. Keep holding the control knob down; press the igniter repeatedly for 40 seconds.
6. Keep holding the control knob down for a further 20 seconds while the pilot establishes itself.
7. Check the pilot. If the pilot is alight, pull your face away and turn the control knob to at least five.
Remember, if at any time during the lighting process the pilot flame is not alight when you expect it to be, turn the gas control to “off” and wait 5 minutes before starting again. If you’re unsure of the lighting process, or the burner does not light as expected; call our team on 1300 465 463.
Do You Find That Your Vulcan Pilot Light Goes Out More Often Than It Should?
If you find you are having to re-light your pilot light often, your Vulcan gas water heater may need repair
Get Help From a Professional Vulcan Gas Hot Water Expert
We’ll show you how to start / light your Vulcan gas water heater shortly, but if you find your Vulcan pilot light goes out often, you should seriously consider bringing in a professional to diagnose and fix the issue.
A pilot light that continues to go out is a sign of a potentially bigger issue and the wisest thing to do is to get an expert on it immediately.
In your Vulcan 4 Star gas water heater, there is a small pilot flame that should remain alight at all times. This small flame lights the main burner whenever water in the tank needs heating. If you can’t get hot water it may be because the pilot flame has gone out and thus, there’s no way for the main burner to be relit. This could occur for a number of reasons such a strong winds, gas maintenance work carried out in the street or an empty LPG cylinder. Today, we’ll show you the safe correct way to relight your gas water heater. As you’ll see, it’s quite easy. However, it is vital that you follow this procedure exactly to prevent a buildup of gas, which if ignites, can cause serious injury.
Before beginning, ensure all flames and ignition sources including cigarettes and lighters are kept well away from the area.
Check For Gas Leaks
First, remove the access panel. The instructions for relighting are clearly laid out inside this panel. It is important to ensure there are no gas leaks. This is best done by simply smelling for gas, especially down the floor level where gas can accumulate. If you smell gas, turn the gas control knob to the “off” position. Shut off the isolation valve in the gas line. Leave the area and call for a qualified service technician.
Turn Off Control And Wait Five Minutes
Once you’ve confirmed there are no gas leaks, turn the gas control knob fully clockwise to the “off” position. You should feel the control knob clicking to the off position. Do not use tools to turn the knob. If you cannot turn the knob by hand call a service technician or licensed gasfitter. It is vital at this point that you wait five minutes for any unburned gas to escape. If you do not wait the full five minutes, residual gas may ignite and cause serious injury.
Light The Pilot
Once five minutes have elapsed, we’re ready to light the pilot using the igniter button. You must remember that this button produces a spark that will ignite any gas that is nearby. This is why it is so important that you turn the control knob to off and wait five minutes for gas to dissipate before every time you use the igniter button. Next, turn the control knob to the pilot position. This is the symbol that looks like a starburst. Depress the control knob fully and keep holding the knob down to allow sufficient gas to flow to the pilot light. After waiting for 30 seconds with the control knob held down, keep the control knob down and now press the igniter button repeatedly for about 40 seconds. Keep your face clear of the combustion chamber. At this point, the pilot should be alight. It is important that you continue to hold the control knob down for a further 20 seconds for the pilot light to establish itself. You can now release the knob. Once the control knob is released, check that the pilot is alight. Do this by looking into the combustion chamber just below the gas control. The pilot will be visible as a very small blue flame.
If The Pilot Is Not Alight
If the pilot is not alight, it is vital that you turn the gas control knob to “off” then once again, wait for five minutes for the gas to disperse. Once five minutes is up, begin the pilot lighting process again from the start- back where we turn the control knob from the “off” position to the pilot position.
Once The Pilot Is Alight
Once the pilot is alight, it’s important for your safety that you remove your face from directly in front of the combustion chamber opening. Then turn the control knob anti-clockwise to at least five. This will allow the main burner to light whenever the water needs heating. When the main burner lights up, it can be a little noisy for the first 2 to 5 seconds, this is perfectly normal. It will very soon settle down to a quiet flame. You can now replace the access panel.
Let’s Review
As you can see, it’s a straightforward procedure but does need to be followed exactly:
Turn the control knob to off.
Wait five minutes for gas to disperse.
Now turn the control knob to pilot.
Press the control knob down for 30 seconds.
Keep holding the control knob down; press the igniter repeatedly for 40 seconds.
Keep holding the control knob down for a further 20 seconds while the pilot establishes itself.
Check the pilot. If the pilot is alight, pull your face away and turn the control knob to at least five.
Remember, if at any time during the lighting process the pilot flame is not alight when you expect it to be, turn the gas control to “off” and wait 5 minutes before starting again. If you’re unsure of the lighting process, or the burner does not light as expected; call Vulcan Service on 131031. Thank you for watching and we hope you enjoy many years of safe, steady hot water.
Example of the installation of an electric storage hot water system
This article talks you through an example of the installation of an electric hot water system.
In this particular example the customer had an existing 315 litre single element hot water system.
The hot water tank was 9+ years old and was found to be leaking from the top of the cylinder. As the tank had exploded, and given it’s age, it was determined that it was in definite need of replacement.
The professional and experienced plumber from Inline Plumbing quickly concluded, based on the fact that all hot water heater’s last only ten years, replacing the unit was economically more sensible rather than repairing it.
Thus a new electric hot water system was agreed upon, and needed to be installed, as a matter of urgency.
In this case, the client wanted to keep things simple, and therefore opted for a straightforward like for like hot water system replacement in order to keep the up-front costs to a minimum.
One advantage of hot water systems lasting around just 10 years is that when the hot water tank eventually breaks down, this gives you the opportunity to replace it with a different type of hot water heater. (A typical example being, the replacement of an existing electric storage water heater for a new gas continuous flow unit.)
Step 1 :- Coordinate delivery of new hot water system with installer being on site
The hot water installer, upon receiving all the necessary details from the customer, was then in a position to order the new water heater together with new brass fittings and valves.
Once a delivery to the site was organised for the new 315 litre hot water tank, fittings and valves, the hot water tank installer was then, simultaneously, able to drain and disconnect the existing tank.
This close coordinating of the delivery of the new water heater, together with the draining and disconnecting of the old tank, can turn out to be a great time saver. So, rather than waiting for his delivery to arrive, the old tank was appropriately put to one side, as described above, in readiness for the arrival of the delivery, shortly after.
Step 2 :- Installation of new hot water system
The next task for the installer was to trolley the new 315 litre tank to exactly the same outdoor position as the existing, at the side of the house.
Part of the new installation of the tank includes the adjustment of pipe-work for both the cold water inlet and the hot water outlet. It is absolutely crucial that these new connections to the hot water system are made with the utmost of vigilance and professionalism.
This being due to the need to prevent undesirable leakages from occurring after completion of the job. So far, the old unit had been disconnected and the new water heater carefully and precisely positioned into place. Also, the new tank had been hooked-up with all the necessary brass fittings and copper pipe-work.
The fittings and pipe for this part of the installation included all necessary brass fittings, plumbers tape and copper pipe. Install a new tempering valve Now that the bulk of the installation was complete, the next part of the process was to fit the required valves to the water heater, that were essential to this installation.
The first valve being the compulsory installation of a tempering valve or, as it is sometimes referred to, a thermostatic mixing valve.
This anti-scolding device is installed as a safety precaution, whereby the temperature of the hot water is ultimately, set to 50 degrees. Install a new pressure limiting valve and non-return isolating valve In addition to the tempering valve, the customer also had a pressure limiting valve and a non-return isolating valve fitted.
As the name suggest the “pressure limiting valve” controls and regulates the water pressure being received from the hot water unit. This is important as this valve could even prevent a leak from occurring. The non-return isolating valve or duo valve (as it is sometimes called) simply controls the flow of water from the tank. So, the 3 valves fitted to the water heater, each have their own function in providing for a successful outcome in relation to the workings of your hot water system.
Step 3: – Test all connections
The installer was now ready to test all connections, and that both he and the customer were satisfied with the result. Of course, it was only after a few hours of completing the installation, that the customer was able to witness her first dose of hot water from the new tank. Remove and dispose of old tank Lastly, the installer had arranged, in advance, for the removal and disposal of the old tank from site.
A company, well versed in the supply and installation of this and other types of hot water systems are Inline Plumbing. In actual fact they have fast become leaders in the field of both hot water replacements and repairs.
They are fully accredited with all the major hot water manufacturers, including Rheem, Dux and Rinnai, and they have won a Rheem award. In so doing, they have also become the preferred installers for Rheem and other major manufacturers.
How to Prevent your Continuous Flow Hot Water System from getting stolen
The theft of gas continuous flow hot water systems is becoming an increasing issue for these outdoor water heaters. Because of the compact nature of these continuous flow hot water systems, they are an ideal size for the thief, who will make for an easy get away if given the opportunity. The last thing you want is for your beautiful newly installed water heater to be stolen just after it has been installed, as this would be both a costly and very frustrating experience.
It goes without saying, of course, that you will want to get the hot water supply to your house back on as soon as possible. So, one needs to take immediate responsibility to ensure the security of the hot water system – at the same time as the installation of the hot water unit.
Therefore, this should be discussed at the time of booking in the installation of the hot water system. One of the best ways to combat the hot water unit thief is to simply have a special cage fitted around it. This article briefly talks about this and other ways to beat the thief so as to give you piece of mind.
So, please read on for more ideas to further protect your asset from getting stolen.
Security Cage for Continuous Flow Hot Water Systems
When having your cage fitted around the water heater, it is vitally important that the cage allows the gas to escape from the hot water system. This is automatically achieved by the make-up of the cage, which should have sufficient ventilation in keeping with the hot water system.
That is, the cage needs to be constructed of a gridded wired mesh or of similar construction. In this way, gas from the water heater is able to escape through the holes in the cage and, at the same time, the gas hot water system is securely locked away from that dreaded thief. Equally important, is that the cage is installed by a licensed professional, and ideally by the plumber installing the hot water unit, so that any pipe work adjustment can be made at the time of the installation of the cage. That is, often either the gas pipe inlet or the cold water pipe inlet may need to be adjusted in order to fit the cage more securely around the water heater.
Alternatively, a locksmith could be employed to build a special purpose-built security cage around the hot water system. It is also worth noting that at least two water heater manufacturers, Rheem and Rinnai, make their own special cages to suit their own brand of continuous flow units. The benefit of this hot water manufacturer specially designed security cage is that one is easily able to order the hot water system and the security cage simultaneously.
Extra Security around the house
There are, of course, other ways in which you can ward off the hot water systems thief. Specifically, one should always make sure that the side gates to the house are locked at all times for extra security.
This is in order to prevent a thief from simply walking through and making for a clean get away with your water heater. Another precaution one could take to ensure the safety of the water heater would be to install outdoor sensors and detectors around the house.
This, together with, say, an outdoor security camera, will be of great help in putting off any intruder, in the event of an attempted theft of the hot water unit.
Installing Continuous Flow Hot Water Systems out-of-sight
Having your gas continuous flow hot water system in an out-of-sight, concealed, location is another good way to prevent it from theft.
The reason being, it would be unable to be seen from the street. If the gas and water pipes are reasonably close by, making it practical to install the hot water system at the back of the house, then this would be another good measure to take to ensure the safety and security of your water heater.
Secure Installation of Continuous Flow Hot Water Systems
Additionally, the continuous flow hot water system may be installed by the plumber in a special way, thereby making it very difficult for the thief to steal the hot water system without breaking a part of it (i.e. the water heater). In conclusion, one should always remember to organise and incorporate his or her chosen method of security, in line with the installation of the continuous flow water system. In so doing, this will help to avoid any undesirable theft of the hot water system.
If you want to have an outdoor continuous flow hot water unit installed, with the right advice about achieving both the most efficient outcome from your water heater as well as the best security for it, then Anytime Hot Water are the specialists in this field. They have an excellent reputation in this field and are fully accredited with all the major hot water manufacturers. In particular, they won the 2014 Rheem award.
If your old hot water heater has a 6 years warranty and it is into service for 10 years, then it is high time you need to think of a new one.
Especially in places with hard water, this may act adversely on water heaters and the machine may not last long after the warranty period.
If you are searching out for a good water heater, there are many models of electric hot water systems available now in the market of different capacity, working mechanisms, makes, and models.
How To Choose The Best Hot Water Heater
Choosing a sufficient water heater model for your home need is so important; however, this is a task demanding a little knowledge and expertise to accomplish.
It is a fact that water heating takes up almost 20 per cent of energy consumption of an average household, and this percentage may go up during the wintertime.
As per the new standards of energy efficiency, a good water heater under 200-litre capacity will have 4 per cent increase in energy efficiency whereas a heater of 200 litres or more capacity can help cut down the utility bills for water heating by 25 to 50 per cent.
There are various technologies used for water heating now, and each of these has significant advantages to offer.
Ask a leading hot water heater plumber
While considering a water heater, it is good to consult a professional to gain a good understanding of the new regulations and enjoy the best energy efficiency advantages.
Looking at the star rating and also having a basic knowledge of the heater properties will help you make a better purchasing decision for long-term benefits.
Evaluating the capacity
The primary parameter, on the basis of which most of the water heater models are sold, is its capacity in terms of how many litres of water each can hold.
As a classic example, a family consists of four members who may take showers, use the dishwasher, and wash a load of laundry may be using about 400 litres a day.
While considering water heater capacity, the basic concepts to understand are; First-hour rating (FHR) for storage-tank water heaters and, Gallons-per-minute rating (GPM) for tankless heaters.
These measures will tell you about the volume of hot water a heater can dispense over a basic amount of time, say in the first one hour.
After consumption of this initial volume, the water may be less hot or fully cooled. It would again take a certain amount of time-based on the model to regain complete FHR.
A professional hot water systems plumber can estimate the capacity of storage needed based on your daily hot water consumption and suggest a perfect sized model.
Hot water heater types
Based on the volume of water you use, there are various choices to make. Some new-age models even cut the cost up to half of the regular models.
Some generic choices to make are;
Storage tank heater — This the most basic model of electric water heaters. As the name implies, these consist of insulated storage in which water gets heated and stored and emerges through a pipe. A useful source for more details.
On-demand tank-less water heater — Tank-less heaters use heating coils which are immersed in water and water gets quickly heated as and when needed. These models are bit more energy-efficient than storage tank models, but only offers a limited volume of hot water at a time, say 10 litres per minute.
Heat pump water heaters — These heaters capture the heat from the air and transfers it to water for quick heating. These hybrid models are found to use 60 per cent lesser energy than full electric heaters. Apart from electric, there are solar water heaters also popular now, but when it comes to simplicity and high efficiency at all seasons, many people still prefer to use good model electric water heaters.
One of the most common problems with a gas hot water heater is the pilot light blowing out, as this will result in only cold water throughout the house.
In this video you will discover how the pilot light lies within the inner and outer cover with help from a master licenced plumber specialist.
VIDEO TRANSCRIPTION
Gas Hot Water Heater Service & Advice
On a gas water heater one of the main things that can go wrong- you know, you wake up, you got cold water, you want to take a shower- it’s usually the pilot light that has gone out and that can be created by many different things, something as simple as a windy night the previous night and just blow it out.
To go over this and to troubleshoot this and figure it out, what we do first and foremost is make sure that the unit is not touched up here; that it’s in the “on” position and that your thermostat is turned up to where it is, which probably is where it is just because that’s where you left it but, sometimes the kids will come through and mess with things, you never know.
At any rate, if that’s all good and you still got cold water, what we do is check for the pilot light. To do this in a standard water heater we remove this cover which is the outer cover. There is also an inner cover.
If you do not have both, you need both, so find one if you don’t. And for that, you probably need to call a certified technician.
So, you take this off and up like this, run it through- that’s the simplest way and I’ll tell you why when we go to put it back in. the next thing is to look in and we follow these tubes down and in and what they do is attach to what’s called a pilot assembly, and that pilot assembly there are three components; the main gas that comes in and through and goes past that it actually attaches to and goes to the burner.
There are three lines that go down in here, you follow them in to find out where the pilot is. The pilot assembly itself is right here.
This is the thermocouple. What the thermocouple is is what the pilot flame actually fires against to create a little bit of an electric energy that holds a magnet inside of the gas valve.
The next is the main gas valve which doesn’t have to do with the pilot except for the simple fact the pilot assembly attaches to it with a couple of little screws and brackets that’s there. The third is the pilot tube itself, which is what runs over and into the pilot assembly that the gas actually travels through into the pilot to make it go.
This is where the pilot tube attaches to the pilot assembly.
Following up from that there’s what we call the pilot itself, that’s where the pilot light comes out. That’s a hooded thing that shoots the pilot across over to the thermocouple.
The thermocouple goes up in past that typically to the left, sometimes it’s to the right, but it’s always to the side either way and that’s where the flame blows against. Some pilot assemblies are vertical as opposed to horizontal and you’ll be able to spot the thermocouple.
Always follow the copper line for thermocouple because that’s typically where your problem ends up being if your pilot is burned out or won’t bite after you light the unit itself. So, those are the components that are in there. What you’re looking for is a small blue flame in there.
If you see that, there’s probably something else wrong with your gas valve or something along those lines that needs to be addressed, probably by a certified person and I’d recommend that you call them out as opposed to trying to troubleshoot any further past that.
Now, what we’ll do is going over how to light a pilot light. Okay. To light a pilot light, the first thing you need to do, make sure your gas is on over to the side. The next thing you need to do is make sure this is in the pilot position matching up with the hash mark that’s on the front of the gas valve.
As you can see, it has a little slot that lines up with that hash mark and it says “pilot”, pointing out towards you to the front. The next thing that you need to do is depress the pilot button.
With the pilot button depressed, you hold this down and then you light down in the water heater to light the pilot, and then you hold this button in- this knob in- for about a minute.
What it’s doing is that flame is blowing against your thermocouple to prove that you’ve flame inside. There’s a bi-metal product and what it does is it creates a little bit of magnetic energy up inside this cylinder in it. So as you hold this button in, it pushes against this and as that energy is created it’s transferred and it holds down that little magnetic button.
So once it’s done, after you’ve held it for about a minute or so, you let it up and that pilot should stay lit. Now remember, this has to be held down for a minute. You have to see that flame for a minute. If you do that and the flame stays on, what you do, turn your knob to vacation mode or pilot mode- some of the other ones have a pilot mode- and you turn it to the “on” position.
After that you go ahead and do a test by turning this, you’ll hear it click and then you’ll hear flame go and see the flame. If you see that, you’re good to go.
The next thing you want to do, shut it back off because you don’t want to put all the doors on before you know you’ve got a flame. You shut it back off and then you proceed to put the inner door on. To do this, most people this is kind of a tricky thing even though it doesn’t look like it, you start upside down and you wrap it in and then it slides right into place.
And then the next thing you do is put the outer door on and slide it down into its little-slotted place and then go ahead and set the temperature back up on your thermostat and you’ll hear the water heater fire. Now something I’ll let you know, in a gas water heater sometimes when you fire it up and it’s been a cold tank all night or more, you’ll hear a dripping or a hissing inside and it sounds like it’s leaking; this is completely normal.
If a tank is dead cold what happens is that with the energy transfer of the flame against the tank, there’s condensation that happens and as it builds up and into flow, it will drip down and hit the burner and it makes a sizzling sound, just like dropping water into a hot vat of oil, it makes a sizzle sound or if you have a wood-burning fireplace you can drop water on it and watch it dance.
The Same concept inside of here, so that’s completely normal. Sometimes even a little bit of moisture around it, if it’s fired up brand-new with cold water, is completely normal.
In your Rheem 4 Star gas water heater, there is a small pilot flame that should remain alight at all times.
This small flame lights the main burner whenever water in the tank needs heating. If you can’t get hot water it may be because the pilot flame has gone out and thus, there’s no way for the main burner to be relit.
This could occur for a number of reasons such a strong winds, gas maintenance work carried out in the street or an empty LPG cylinder. Today, we’ll show you the safe correct way to relight your gas water heater.
As you’ll see, it’s quite easy.
However, it is vital that you follow this procedure exactly to prevent a buildup of gas, which if ignites, can cause serious injury. Before beginning, ensure all flames and ignition sources including cigarettes and lighters are kept well away from the area.
CHECK FOR GAS LEAKS
First, remove the access panel.
The instructions for relighting are clearly laid out inside this panel. It is important to ensure there are no gas leaks. This is best done by simply smelling for gas, especially down the floor level where gas can accumulate.
If you smell gas, turn the gas control knob to the “off” position. Shut off the isolation valve in the gas line.
Leave the area and call for a qualified service technician.
TURN OFF CONTROL AND WAIT FIVE MINUTES
Once you’ve confirmed there are no gas leaks, turn the gas control knob fully clockwise to the “off” position. You should feel the control knob clicking to the “off” position.
Do not use tools to turn the knob. If you cannot turn the knob by hand call a service technician or licensed gasfitter.
It is vital at this point that you wait five minutes for any unburned gas to escape. If you do not wait the full five minutes, residual gas may ignite and cause serious injury.
LIGHT THE PILOT
Once five minutes has elapsed, we’re ready to light the pilot using the igniter button. You must remember that this button produces a spark that will ignite any gas that is nearby.
This is why it is so important that you turn the control knob to “off” and wait five minutes for the gas to dissipate before every time you use the igniter button. Next, turn the control knob to the pilot position.
This is the symbol that looks like a starburst. Depress the control knob fully and keep holding the knob down to allow sufficient gas to flow to the pilot light.
After waiting for 30 seconds with the control knob held down, keep the control knob down and now press the igniter button repeatedly for about 40 seconds. Keep your face clear of the combustion chamber.
At this point, the pilot should be alight. It is important that you continue to hold the control knob down for a further 20 seconds for the pilot light to establish itself. You can now release the knob. Once the control knob is released, check that the pilot is alight. Do this by looking into the combustion chamber just below the gas control. The pilot will be visible as a very small blue flame.
IF THE PILOT IS NOT ALIGHT
If the pilot is not alight, it is vital that you turn the gas control knob to off then once again, wait for five minutes for the gas to disperse. Once five minutes is up, begin the pilot lighting process again from the start- back where we turn the control knob from the “off” position to the pilot position.
ONCE THE PILOT IS ALIGHT
Once the pilot is alight, it’s important for your safety that you remove your face from directly in front of the combustion chamber opening. Then turn the control knob anti-clockwise to at least five.
This will allow the main burner to light whenever the water needs heating. When the main burner lights up, it can be a little noisy for the first 2 to 5 seconds, this is perfectly normal.
It will very soon settle down to a quiet flame. You can now replace the access panel.
LET’S REVIEW
As you can see, it’s a straightforward procedure but does need to be followed exactly.
Turn the control knob to off.
Wait five minutes for gas to disperse.
Now turn the control knob to pilot.
Press the control knob down for 30 seconds.
Keep holding the control knob down; press the igniter repeatedly for 40 seconds.
Keep holding the control knob down for a further 20 seconds while the pilot establishes itself.
Check the pilot. If the pilot is alight, pull your face away and turn the control knob to at least five. Remember, if at any time during the lighting process the pilot flame is not alight when you expect it to be, turn the gas control to “off” and wait 5 minutes before starting again.
If you’re unsure of the lighting process, or the burner does not light as expected; call the team at Inline Plumbing.
Thank you for watching and we hope you enjoy many years of safe, steady hot water.
In your Rheem Stellar gas water heater, there is a small pilot flame that should remain alight at all times.
This small flame lights the main burner whenever water in the tank needs heating. If you can’t get hot water it may be because the pilot flame has gone out and thus, there’s no way for the main burner to be relit. This could occur for a number of reasons such a strong winds, gas maintenance work carried out in the street or an empty LPG cylinder.
Today, we’ll show you the safe correct way to relight your gas water heater. As you’ll see, it’s quite easy. However, it is vital that you follow this procedure exactly to prevent a buildup of gas, which if ignites, can cause serious injury. Before beginning, ensure all flames and ignition sources including cigarettes and lighters are kept well away from the area.
CHECK FOR GAS LEAKS
First, remove the access panel. The instructions for relighting are clearly laid out inside this panel. It is important to ensure there are no gas leaks. This is best done by simply smelling for gas, especially down the floor level where gas can accumulate. If you smell gas, turn the gas control knob to the “off” position. Shut off the isolation valve in the gas line. Leave the area and call for a qualified service technician.
TURN OFF CONTROL AND WAIT FIVE MINUTES
Once you’ve confirmed there are no gas leaks, turn the gas control knob fully clockwise to the “off” position. You should feel the control knob clicking to the off position. Do not use tools to turn the knob. If you cannot turn the knob by hand call a service technician or licensed gasfitter. It is vital at this point that you wait five minutes for any unburned gas to escape.
If you do not wait the full five minutes, residual gas may ignite and cause serious injury.
LIGHT THE PILOT
Once five minutes has elapsed, we’re ready to light the pilot using the igniter button. You must remember that this button produces a spark that will ignite any gas that is nearby.
This is why it is so important that you turn the control knob to “off” and wait five minutes for the gas to dissipate before every time you use the igniter button. Next, turn the control knob to the pilot position.
This is the symbol that looks like a starburst. Depress the control knob fully and keep holding the knob down to allow sufficient gas to flow to the pilot light.
After waiting for 30 seconds with the control knob held down, keep the control knob down and now press the igniter button repeatedly for about 40 seconds. Keep your face clear of the combustion chamber. At this point, the pilot should be alight. It is important that you continue to hold the control knob down for a further 20 seconds for the pilot light to establish itself. You can now release the knob. Once the control knob is released, check that the pilot is alight.
Do this by looking into the combustion chamber just below the gas control.
The pilot will be visible as a very small blue flame. IF THE PILOT IS NOT ALIGHT If the pilot is not alight, it is vital that you turn the gas control knob to “off” then once again, wait for five minutes for the gas to disperse. Once five minutes is up, begin the pilot lighting process again from the start- back where we turn the control knob from the off position to the pilot position. ONCE THE PILOT IS ALIGHT Once the pilot is alight, it’s important for your safety that you remove your face from directly in front of the combustion chamber opening. Then turn the control knob anti-clockwise to at least six. This will allow the main burner to light whenever the water needs heating.
When the main burner lights up, it can be a little noisy for the first 2 to 5 seconds, this is perfectly normal. It will very soon settle down to a quiet flame.
You can now replace the access panel.
LET’S REVIEW
As you can see, it’s a straightforward procedure but does need to be followed exactly.
Turn the control knob to off.
Wait five minutes for the gas to disperse
Now turn the control knob to pilot
Press the control knob down for 30 seconds
Keep holding the control knob down; press the igniter repeatedly for 40 seconds.
Keep holding the control knob down for a further 20 seconds while the pilot establishes itself.
Check the pilot. If the pilot is alight, pull your face away and turn the control knob to at least six.
Remember, if at any time during the lighting process the pilot flame is not alight when you expect it to be, turn the gas control to “off” and wait 5 minutes before starting again.
If you’re unsure of the lighting process, or the burner does not light as expected; call Rheem Service on 131031. Thank you for watching and we hope you enjoy many years of safe, steady hot water.
Does the Anode Rod in your hot water heater keep failing?
Before replacing your Anode Rod, consider a different kind of hot water system
Did you know there are hot water systems that don’t use Anode Rods?
We’ll show you how to replace an Anode Rod shortly, but before you replace another Anode Rod in your hot water system there are some things you should consider. Are you replacing the Anode Rod more often than you should (once every 3-4 years)? If you find you need to replace your anode rod more often than recommended, it’s most likely you need to replace your hot water system.
If you need to replace your existing hot water system and you don’t want to deal with having to replace the anode rod every 3-4 years, you should consider installing an instant / continuous flow hot water system.
Instant hot water systems come with several advantages including: continuous hot water supply, compact units which save space in your home, no leaks, and temperature control.
Changing the Anode rod every four years is a great way to extend the life of your water heater.
An anode rod is a special metal element that’s meant to slowly dissolve so that the tank itself doesn’t corrode.
When the anode rod is depleted, it no longer offers corrosion protection for the tank.
So it’s best to replace the rod before that happens. I’ll show you how to do it.
You can order an anode rod replacement for your water heater by directly from the hot water heater manufacturer.
You’ll need
a replacement anode rod,
a socket wrench,
a 1 and 1/16 inch socket,
a 24-inch cheater bar or pipe,
a flat blade screwdriver,
Teflon tape,
a garden hose,
and a hacksaw.
First, turn the power off to the water heater at the circuit breaker. For gas heaters, you should turn off the gas supply.
Close the shut-off valve at the cold water inlet line. Open a hot water faucet somewhere in the house that will relieve the system pressure inside the tank. Next, fasten a length of garden hose to the drain valve at the bottom of the heater. Run the other end of the hose to the nearest floor drain or outside the home.
Open the water heater’s drain valve and drain approximately two gallons of water from the tank. Locate the anode rod position on the top of the tank. It will be underneath one of the plastic caps. On older models, the anode rod may be exposed. Remove the plastic cap to expose the anode rod.
If it’s not clearly visible down to the tank shell, take a flat blade screwdriver and carefully remove the insulation and expose the anode rod head.
Using a 1 and 1/16th-inch socket, remove the anode rod by turning it counterclockwise. Have a rag handy because there will be some seepage of water around the anode rod’s location. In most cases, you’ll need a cheater bar or length of pipe to apply enough leverage to break the initial seal on the anode rod. Lift the anode rod out of the tank, but be careful, the metal may be hot. It will probably show some signs of deterioration.
If it looks something like a half dissolved Alka seltzer, it’s been doing its job. Prepare the threads to the replacement anode rod with Teflon tape. Wrap six or more turns. Receipt the new anode rod and tighten thoroughly. If space above your water heater is tight, a flexible replacement anode rod makes the installation easier.
Next, turn on a hot water faucet somewhere in the house. Turn the cold water supply to the heater back on and let the tank fill.
After about a minute, turn off the hot water faucet, then check for leaks around the new anode rod. If there are no leaks, replace the plastic cap on top. Turn the power back on at the circuit breaker. For gas heaters, turn the gas supply back on. You may need to relight your pilot per the instructions in your use and care manual.
Check carefully for leaks at the anode rod threads and check again in 24 hours.
Congratulations! You’ve just made an important repair that will greatly extend the life of your water heater.
One of the things we’re worried about is the water heater.
We’re a two-unit, so this one here is ours. Are you on the first floor? Yea. Okay.
Water heaters do fail someday and it starts with understanding how old they are. So, when I look here… this hot water heater installer did us a nice favour, he actually told us the day he installed it. It was 2006, so this is now ten years later. But there’s always a rating plate somewhere in the body, it’s going to tell you the date of manufacture. So, here’s the model and serial number and I would guess that this was made in November of 2003. So this looks like it might have been on the shelf for three years. Now, there’s also a listing of the warranty- how long they expect it to last, which is six years. So you’ve got a 13-year-old tank in use for ten that they expected to last for six.
So most people wait for the water heater to fail and there’s always a big hubbub, get us right over a flooded basement and everything else. This might be the best day you could ever have to change this water heater up. Alright. Let me go the track and get some tools. To get started, I need to shut off the water supply, the gas supply and drain the water here. I’m also going to remove some of the old gas piping and the overflow from the temperature and pressure relief valve. Okay. We also have this gas line on the way, I’m just going to swivel this pipe out of the way just enough to push the water heater out. That should do it right here.
Next, I break the galvanized flue gas connection at the top of the water heater. I’m going to reconnect to the hot and the cold copper water line. So it’s a lot easier to clean them in place and then cut them. Once they’re cut, we’re ready to take this water heater out of here. All right, Kevin, say hello to your new water heater. Hello. All right. So, you’re one of the first homeowners that come under the new energy guidelines from 2015. The government wanted to reduce the amount of energy that was lost from the water heater. And most of that loss happens what they call standby loss. Here’s this forty-gallon tank that wants to give off its heat all day long to the basement. So they did it by making more insulation. So if you look it’s the same height, it has the same cold water line right here with the dip tube that goes to the bottom, hot water leaves right here, same flue connections, gas piping is the same.
The one thing that has changed is the dimension. So you can see the old tank was just over 19 inches, this is 22. So, it means you’ve got a total of 3 inches wider, which means an inch and a half more insulation all the way around and at the top. And that’s a good thing. So, you got a wide-open basement, no big deal. If there are a couple of people that this new law is going to come into effect for, it’s going to be some issues. Anybody that’s got a water heater that is jammed in a tight little closet. Other people have condos. Sometimes I see them jam tighten the closet, you’re not going to fit them all. The other thing is that if you have a fifty-five gallon or larger water heater, they now have to be so efficient, you can no longer vent them into a chimney. You have to use a nonmetallic plastic vent and sometimes that can really add to the insulation but, you’ve got plenty of space so it’s no big deal for you.
Hot Water Tank Replacement Service Sydney
We also got you a ten-year warranty water heater, this was a six. This is a ten, so it should last a lot longer. Great. All right, you ready to put her in? Yeah, let’s do it. Why don’t you take this in… follow me. Let me just dance it in. I got it. All right. So look at this now. Remember I said it was no big deal you had plenty of space? Look at this, the flue doesn’t line up, the hot and cold don’t line up because the extra width gets in the way of this concrete pad that stick it up above the floor. So just means a little more re-piping. Okay. So, I’m going to start by reconnecting the gas, so I’ll just dry-fit the old connection to the union and that tells me that I need about an inch and a half. That’s perfect. So I’m just going to put a little pipe dope on the threads. Okay. Let’s do that. A little bit of pipe dope on the face of the union, right, like that not too much. This is the drip cap that goes into the bottom of the tee.
This is a vacuum valve that would allow if it ever tries to drain the tank, it will allow air in so it wouldn’t let the tank collapse or implode. So, with this flue pipe, we have a crimped end and that has to fit inside this fitting, so I’ll hold this up and this part has to go over this crimp so this mark should be perfect right there. All right. So this is the overflow and that comes from the temperature and pressure relief valve. This is a really important safety device if the tank ever got too hot or too much pressure it would relieve and they wouldn’t want that relief to go onto somebody so it has to be down to within 12 inches of the floor.
All right. So we’re done. It’s now time to put the water back on. Listen for it. Okay. And while that tank is filling, I’m going to turn the gas back on. That’s on and I want to do a leak test on all those new connections. If there was a leak you’d see a bubble coming up. There it goes. All right. Gas is back on, water is heating up. I’ve labelled the first floor; I’ve got the date of installation. You’re good to go. Awesome. Thanks, Richard. Do you mind throwing in your autograph on there too? My autograph? Yeah. Really? That might drop the value of this thing. All right. I don’t think I’ve ever done that before. I’ll see you in ten years.
Thanks, we’ll see you then. Thanks for your help. Your signature, really? Really silly. All right, let’s talk water units. You know, the new energy regs came in, I’m thrilled about them. They’re going to make more insulation, make them a little bit bigger. Right. In that case, I had to add a little more pipe in because it hit that concrete on the bottom.
But if it didn’t hit the concrete you would have been fine, right? Yeah. It would have lined up and fine. Okay. All right. Now, inside these things they’re increasing the amount of insulation, as I mentioned, from three-quarters to inch and a half and that’s great, both here and here, but it’s not going to make this huge difference because inside of a gas-fired appliance like this, it has a burner at the bottom, a tank filled with water, and coming up through the middle is this flu pipe here that has flu products, right? So think about a hot tank of water, ice-cold air from the basement coming up through, it’s just going right up to the chimney, much of the standby loss is not from here but up the chimney. So, it’s basically thermos bottle, they’ve doubled the size of the insulation but we still have a hole running right through the bottle. Right. I believe it’s a ten flap open and all the air is going to come out. Yeah, I get it.
So, if you go up over fifty-five gallons you can no longer use this style of water heater, you can’t use that conventional burner and chimney. Now, they’re going to make it so that you have to vent it through some nonmetallic piping to outside, not into the chimney and bring a second line in to bring air in for combustion. Maybe that’s a good thing because the reason that they vent it is that the burner is that much more efficient… super-efficient and when the burner is off it shuts off, which stops some of this off-cycle loss through the chimney.
So, we’re going to pick up some efficiencies there. That’s right. But it’s still a big tank. That’s right. All right. An electric not much changed here in the smaller units. Here’s a standard electric water heater. You’ve got an electrical element here and here, you’ve got increased insulation. It’s much like a coffee maker, you’re trying to heat the water, okay? Right. So, not much changed here up to 55 but over 55 gallons you can no longer use this style. You have to use a heat pump water heater. So you can no longer use the elements, those two elements, you have to use this monster over here? That’s right. So this is a tank underneath here and then above it is a heat pump and a heat pump is really like an air conditioner in reverse where it’s going to find heat inside the house, inside the basement from other sources, deliver it efficiently into here and reduce the electro [not clear] about 60%.
What’s this guy though for? This is an element, isn’t it?
This is the backup element to make sure you always have hot water and that should be there as a backup. This should get most of it done. So that’s super-efficient. That’s right. So, does it affect all water heaters? Is everything changing? Well, the thing that doesn’t change is if you have tankless or instantaneous water. This sits on the wall, gas-fired and when you don’t use hot water it uses nothing. You can’t get much more efficient than that. No standby loss, so this one is as good as it gets. And when you do want to take a shower you could do it for 24 hours a day.
You know, I’m going to start thinking about it. if I’m getting pushed into a new model like this I might start thinking about something like that in there. That’s right. Cool. Now, so how do you get a ten-year warranty? I mean, are you buying a ten-year model versus…? I want a ten-year warranty. A lot has changed. In the old days, you had a five-year unit and you have a different ten-year unit and the ten-year unit had a secondary anode rod which is built a little better. Now, it’s one unit, six years warranty and then you can buy an additional warranty from the manufacturer. And some manufacturers, to get the additional warranty, insist that you buy this secondary anode. Now, the anode is a sacrificial rod that sits inside. This used to be an anode right here. And once that goes this is what happens. So that’s how you get your extra insurance? That’s right. In some cases, you were saying, what do the others do?
Some of them are just going to buy an additional insurance policy for a couple of hundred bucks. So, it’s basically just a six-year tank with a ten-year label on it. Exactly. If it fails they’ll replace it? Absolutely. All right.